Words and pictures by James Gifford.
Another Dimension. From a technical perspective, capturing birds in flight is probably the hardest genre of wildlife photography. Not only is your subject able to move in an extra dimension (vertically,) making it more difficult to track, but you will often be pointing your camera at the sky without the support of a beanbag or tripod, thus making it physically challenging as well. So, in order to get a sharp, focused image, you must have a full understanding of your camera’s functions, considerable practice, and quick reactions.
 Getting Ready for Take-Off
The best chance of catching a bird in flight is just after it takes off. You will need a fast shutter speed to freeze the action (ideally, at least 1 / 1 600). This will require a fairly wide aperture (low f-number,) but try not to go too low: having a greater depth of field will help you obtain a sharp image if the bird flies towards or away from you. (7.1 is a good compromise.) To get this combination, you may need to raise your ISO.
Choose high burst firing mode to maximise the chances of getting the best action shot, lock focus on the bird, and then wait with finger poised to squeeze the trigger. Try to follow the bird as it starts flying, to capture as many shots as possible.
Be Prepared
While you’re waiting for your African Fish Eagle to take off, think carefully about composition. The direction in which the bird is going to fly is an infinitely complex prediction, involving the wind, potential prey targets, the call of a mate, etc.
In short, it’s virtually impossible to predict, so don’t zoom in too tight. It’s better to have to crop the image when you’re processing than to end up cutting off the edge of the bird’s wings. Also, bear in mind that some birds might initially drop below the height of their perch before their beating wings take them higher, so don’t position your subject right at the bottom of the viewfinder.
Mid-Flight
Photographing a bird mid-flight is even tougher. As the distance between you and the bird is constantly changing, you should switch to Continuous Focus (AI Servo on Canon). The real challenge is tracking your subject precisely enough to ensure your focal point remains on the bird as it moves across the sky. If you miss it just slightly, you will end up focusing on whatever is behind the bird, leaving you with a blurry subject. Fortunately, most DSLRs have an automatic focal point selection option, which means the camera selects the subject automatically. If you are shooting against a clean background (like the sky), then this focusing method is pretty accurate and fast. When the bird is flying in front of vegetation, however, the camera might be confused and focus on the trees instead. One compromise, available on some models, is zone focusing. This option means you just need to keep the bird in the right area of the viewfinder for the camera to realise that it is your subject, thereby giving you more room for error than using a single focal point.
Know Your Subject
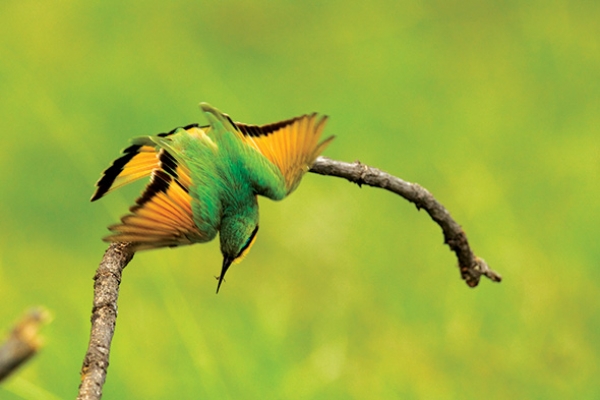
As with all wildlife photography, learning and anticipating behaviour can give you the vital extra few seconds of preparation. Some birds give you a clue before they’re about to take-off, by either shaking their feathers or defecating. Others have specific behavioural traits: Little Bee-eaters, for example, often return to the same perch; so, if you miss the take-off, stay focused on the branch and ask a friend to tell you when they are returning, so you can fire off a burst and capture them as they are about to land.
Location, location, location
A waterhole is an ideal practice ground, giving you multiple opportunities to hone your technique. The flocks of birds which tend to congregate at water yield a greater variety of compositional possibilities, while simultaneously attracting hungry raptors on the hunt. Carcasses, meanwhile, are magnets for vultures and other birds of prey which will often compete with each other, and the occasional jackal, for their share of the spoils. Alternatively, waiting patiently at a nest site can be rewarded with a truly unique image, but keep your distance to avoid disturbing the parents.
PRO TIPS
If possible, try to position yourself so the bird is flying directly towards you. This is a more unusual composition and will create a striking image. Once you think you have mastered the general technique, get creative: slowing the shutter speed down a bit (e.g. 1 / 500) will keep the head of the bird sharp while blurring its wings, giving the impression of movement. If you really want a challenge, go even slower to 1 / 100 and try panning the flying bird.